|
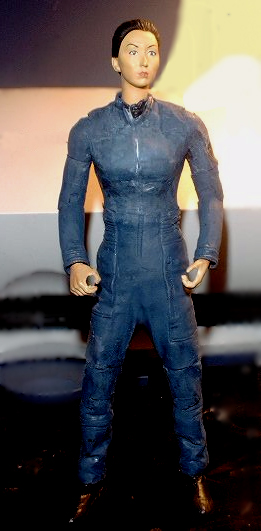
Using the old Boil
and Pop method, disassemble the above figures. You will need the
upper torso, internal armature of the lower body, hand and shoes of
T'Pol. From Hoshi, you need the head. Uhura the arms and
from Reed the "rubber" pants section of the lower body.
Modification of the parts:
Shorten the legs of T'Pol by removing about 1/2 inch from the lower leg
area, drilling a small hole in one end of the cut and craving a small
peg on the opposite part, to be glued together later.
Put Reed's pants on the armature and cut Vee shaped panels in the
back from the waist to the cloche , in effect taking in the waist
to fit the smaller female body, glue the pants with Guerrilla
Glue to the armature and set aside to dry. You can use other
types of hobby glues that are tacky and set quickly.
Sand off all
detail of T'Pol's upper body and also reduce the breast size.
Scribe the pockets and zippers of the duty uniform on to the
body. At this point you need to make a decision, you can
reassemble the body parts, trim down the pants where they meet the legs
and try to paint all of the body parts to the same color or you can
precede to the next section, which is what I did because I couldn't
find a paint that would stick to AA's plastic without cracking and
faking off.
Casting the parts.
Make
rubber mold of the upper torso and the new lower torso. Before making
the molds, plug the small inner holes in the shoulder holes with
moldering clay, leave the hole that you drilled in the lower legs ends
open. If you have never made a mold before, I would recommend
Smooth On products, they have many good materials, that are easy
to use, a 1:1 mix ratio and easy to follow instructions.
Once
the molds have been made and have cured, cast the parts in resin.
You now can finish up the uniform detail on the upper torso and
blend the pants with the lower legs section. You will need to
drill hole in the shoulder sockets to accept the should plug of Uhura's
arms and depending on how you oriented the upper torso when making the
mold, you will need to drill out the neck or the waist to accept it
opposite part. To allow the arms to move, coat the plug with a
small amount of oil or K-Y jelly/Vaseline. Use epoxy to attach
the arms to the shoulders and the oil will prevent the epoxy from
sticking to the plug, allowing the arm to rotate. You can use epoxy to
attach the lower leg to the lower torso.
You now need to prime the body for painting, this will help the
paint to stick to the resin and plastic parts and also show any
imperfections that you need touch up. I used Squadron Shop Green
Stuff, which is nothing more than Auto Spot and Glaze Putty. This
can be sanded smooth and give a nice feathered edge. Now with a
little trimming and hot water you can attach T'Pol's hand to Uhura's
arms and the shoes to the lower legs. I couldn't come up with a
way to allow Hoshi's head to move, so I selected a position I liked and
glued it in place.
|