| Take
a 9 inch playmates female body. Remove the uniform from a Generations
Kirk (9 inch) and turn it inside out. Place it onto the female body,
and mark the sides with a pencil (or like device) as closely as possible
to where you think the stitching needs to be made. Also mark underneath
the arms and along the bottom of each arm, toward the wrist.
Next,
I suggest using a seam ripper or other like device to remove the belt from
the uniform, so it does not get in your way while sewing. Place this
aside. I also suggest removing the arm band that denotes years of
service. Place it somewhere safe as well.
With
the uniform off the body, close the Velcro and thread your sewing machine
with dark red thread. I started at the bottom of the jacket and followed
the curved line (in toward the waist and then out toward the bust) upward
to the underarm, turning the jacket to stitch up the arm. Follow
the line you drew all the way to the wrist, being careful to not make the
sleeve opening too tight to get the female hand through.
Optional
note: You can remove the white sleeve cuffs if you are making a ST2
Saavik, as the cuffs did not show in that film.
Once
you have finished one side, take this opportunity to examine the work from
the outside of the jacket, making sure you did not stitch over the black
piping that runs along the back of the figure. If you have done this
and do not like it, use a seam ripper to take out the stitching you just
did, and then re-do until you get it right. This is the part that
causes headaches. Or at least one of the parts.
Repeat
the stitching and examinations on the other side.
Now...
Once you are satisfied with the stitching...you must CUT AWAY the now extra
material inside the Generations Kirk Jacket, otherwise the uniform will
not turn right side out correctly. When I first did t his, back when
the Gen Kirks were expensive, it took a deep breath and some faith in my
own work. Again, without cutting away this material, you will get
one funky, gathered and wrinkled look to your jacket. It must be
done.
Using
a Rit color dye, or watered down paint, dye the white collar using a small
paint brush. The same must be done for the shoulder strap and arm
band.
To
finish off the jacket, use some rubbing alcohol and soak the Captain's
rank on the sleeve, below the elbow. With some work, you should be
able to scrape this off now.
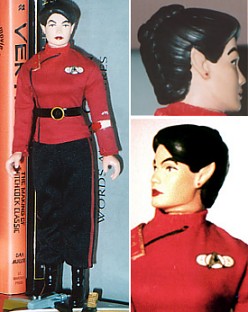
Now
for the important part. THE HEAD.
When
this head was released by playmates several years ago, I immediately
knew I would use it to make a Saavik. Unfortunately, my time is not
what it once was, so it took this long to find the spare hours to finish
her. This head is the TT Dax head from Trials and Tribblations.
Make
a mold of the head using either latex paste/cream ($9 to $13 at most hobby
shops) or a two part mold maker ($25+ from various online dealers).
More information on making of the mold can be found on several hobby sites
on the internet.
Once
you have a mold (I used latex), and once you have managed to remove the
head from within the mold without cutting or tearing the latex (build it
up very thick), you then need to get out your resin ($40 from places like
Bare Metal online). I used a 2 part resin, equal parts A & B,
which cures in about 5 minutes, which I found a bit too fast. Mix
your resin and pour directly into the latex mold. (NOTE: If you used
a 2 part mold agent, you may need to use a releasing agent or spray so
your resin will not permanently bond to the mold.
Once
the cast has settled (even though it takes 5 minutes, I give it a few hours),
remove the latex mold. I have fairly strong fingers and can peel
the mold off, though every once in a while I lose patience and cut it off,
making garbage out of a mold that took a few days to make.
Now...making
this short...you have a white Dax head, probably with a few bubbles in
it...and worst case, a missing nose or a big hole where the eye should
be. At this point you should start over. (Or take a drink.
I don't drink, so starting over...and yelling a bit...was my only choice.)
Let's
say the mold is fine. Worry about the pinhole bubbles later.
Using a dremel ($30 to $70 at various stores) and a cutting wheel, carefully
cut off the bun of her head. Then using a grinding wheel, grind it
smooth and rounded, to about the size of what her skull would look like,
or lower. You can always add more, but if you have too much, it will
look like a HUGE hairdo.
Now
you need to grind off the tops of the ears. Once this is done, use
a 2 part epoxy putty ($9 to $15 depending on where you buy it and what
brand you find. I have used Magic Sculpt...not by crayola...or
Milliput.) You need to mix this in equal parts (and wash your hands
carefully afterwards). Place a small triangle at the top of each
ear, being careful not to touch the other ear while doing this, as you
might mess up the work you just did. I often do one ear one day and
the next another.
Shape
the pointed ear as closely as possible, though you will not be able to
get it perfectly. This will be done by carving at it once it has
hardened. Once the ears are hard, and once you have carved and sanded
them to the right look and shape, you can begin sculpting on the
hair, which takes a few days, as you don't want to mess up the previous
layers. I used the same epoxy putty as I did on the ears. BE
CAREFUL not to cover up your new ears. Go a layer at a time.
I started with the bangs and sides. Once I got the base look, I added
the braids one at a time over the next few days.
Once
the hair is hard, carve, shape, and sand it to the proper look. Then
using an exacto knife, add texture, but don't over do it.
The
above instructions were very basic. I tried to do this as quickly
as possible. I also did not go into painting. If anyone needs
more detailed information, please let me know.
*
Hopefully the painting description will be added at a later date. |